Wednesday, December 30, 2009
Let's cool it, the old way
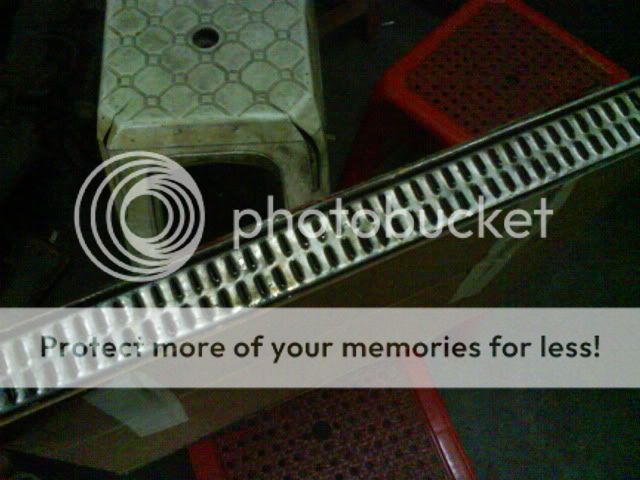
After searching for it for quite sometimes, I finally stumbled into this OEM cold air intake hose, normally attached with the proton saga iswara production cars from 1998 and below. The millennium batches were sold without this air ramp extension. No, it is not sold in spare parts shops. Have to hunt those earlier production cars. So it's quite rare, really. And not everyone really care about it too. Thank goodness. hehehe.
Tested on hi revs, the temperature remain stabil. So it doesnt affect much to the previous AFR setup. So it's good to go!
The best thing is, got it FOC. Thanks to that foremen. Thanks man!
By the way, this is how it looks like in the engine bay. Keep it simple. Keep it low! hehehehhhs
Sunday, November 22, 2009
Latest Wheels
Hiding The Rust
Well, seems like i got some free time. Dismantled my rear seats and this is what i found! :
it was rust all over!
Before it'll parasited even more, these are a few steps that i did to the rusty part. It was time for a DIY session!
Went to local hardware shop and bought a can of anti rust spray and a piece of sand paper.
After a bit of cleaning to the rusty metal, I sprayed all the infected sections. This is the end result :
There you go. Hopefully it'll slow down the process of deformation of the car's body.
Friday, November 20, 2009
Hug Me
oh, the previous seat spoiled at the tapak. so I bought this one, using back the original Iswara mountings. I wasn't left with much options, since I insist on using back the original tapak. It's a no brand seat, people call cap ayam one, ok lah, better than nothing, at least it's brand new.heeheheehe
Dry Grip
Setup and Setup and Setup
well, this post is a bit delayed. just sharing what i've done with this almost a decade years old vehicle.
The AFR setup.
Instead of convensional method, which is turn the screw and use your hearing, this time the Innovate was used so that the appropriate AFR is achieved at every gear change. Failure to set the nicely done AFR setup may cause the failure to head gasket, in other words, gasket blown!
on the road tuning
once the AFR was achieved, it was time for the roller! was itching to know how much horsie and torque were swueezed out
the figures? there's no way m going to shout it out here..hehehe
Thursday, August 13, 2009
Drive Shafts keeps Spoiling
In two months I changed the drive shafts 3 times! Arghh..Whyyyy oh why.!!!!
First time
Soon after, there you go again. Pull out the drive shaft, and found out this:
Changed the DS again, and sent the shaft to the lathe machine to make the clip slot. No more than later, the shaft near the flywheel were in a failure state. $$$$. Changed. Wonder what's coming on up. Hopefully, only the good things.
Walking Like Crabs
Since the last accident, I've been repairing the car bits by bits. Repairing also means modifications to me. One of the major repair is the trailing arms. It seems that the panel workshop did not seems to change it, as claimed, or maybe it was changed with a bad one, eitherway, it meant that I got a faulty trailing arm. It started with making weird noise, but I chose to ignore it since it doesnt effect the handling. But kinda lately, it has started messing with the handling. Handling and braking is priority number one for me. Doesn't matter how fast or how pretty your car is, if your handling sucks, well, it's not quite safe to drive. In other words, it's risky!
After some inspections, found out that there were some loose nuts. And the trailing is in a bent condition. No wonder why the alignment machine found out that the camber and the alignment at the back is so out of tune!
Now, immediate action is needed. I was trying to source out the most appropriate choices for me, which took some effort. If money wasn't an issue, I would've opted for a new one, which bear the cost of rm1.5k-2.8k. The recondition trailing arms got a reputation of not being a reliable product. If you are lucky, you'll get a good one. If you're not, you're getting a good one, but only work in a short amount of time. Out of a nowhere, someone offered me a second hand one, which is quite hard to get, and it came with a reasonable price. Without further considerations, I said 'yes'. So there you go.
Here's the old one. Along with it is the UR anti roll bar (which, of course, I took it back with me and installed it back again with the current one.)
Now this is the original second hand trailing arm
The part changing process
there..I thought the problems were settled.
Nope.
Turns out that the current trailing arm also suffered misalignment and needed camber adjustment. Then I stumbled into a workshop that have the proper tools to pump up the camber again. Here are they:
4 hours later, the car was running on the street again. This time it wasn't crab walking anymore. But, the noises were there again! Maybe I need to check the bushes..That will have to wait
After some inspections, found out that there were some loose nuts. And the trailing is in a bent condition. No wonder why the alignment machine found out that the camber and the alignment at the back is so out of tune!
Now, immediate action is needed. I was trying to source out the most appropriate choices for me, which took some effort. If money wasn't an issue, I would've opted for a new one, which bear the cost of rm1.5k-2.8k. The recondition trailing arms got a reputation of not being a reliable product. If you are lucky, you'll get a good one. If you're not, you're getting a good one, but only work in a short amount of time. Out of a nowhere, someone offered me a second hand one, which is quite hard to get, and it came with a reasonable price. Without further considerations, I said 'yes'. So there you go.
Here's the old one. Along with it is the UR anti roll bar (which, of course, I took it back with me and installed it back again with the current one.)
Now this is the original second hand trailing arm
The part changing process
there..I thought the problems were settled.
Nope.
Turns out that the current trailing arm also suffered misalignment and needed camber adjustment. Then I stumbled into a workshop that have the proper tools to pump up the camber again. Here are they:
4 hours later, the car was running on the street again. This time it wasn't crab walking anymore. But, the noises were there again! Maybe I need to check the bushes..That will have to wait
Wednesday, August 12, 2009
Cooling System
Since i've been getting a raise in temperature when holding topspeed, (maybe it's due to hi comp, but..) i opted to try to upgrade my radiator. the old one is still working fine, but I just wonder what would've happen if I change it to a thicker one.
3 choices:
1. fully aluminium
2. aluminium (only the rad)
3. copper
after for a few consideration, i opted for copper. got it for quite a reasonable price, pretty much almost the same price with choice no 2. although aluminium rads seems like an interesting and tempting device, maintenance reliability comes into consideration. so, copper it is. also with a new cap!
improved better on hi revs. but with aircond on, it's still overheat! now, what next?
Thursday, June 18, 2009
Bolt On!!
POWERZONE SUPERCHARGER KIT
4G18 STROKER KIT
Coming down with RM2000 price tag, not many would opt for it, but not to say, some dig it down under just to get one of these. It's mainly one of the invisible weapons for those who choose to maintain their 4G15 engine and upgrading the cc and TORK without having to register to JPJ and still maintaining the standard looking engine, but with a monstrous performance inside. Finding one is not easy, and owning one is not cheap. Managed to snap this photo after finding it lying around at a workshop, and guess what, somebody already bought it. Duh.
The Wonderful World of Webers
Hi, thought I'd like to share with you guys a lil something about weber carbs on a 4g13/5 engine. Just an experience from my previous setup during my old weber days. Miss them 'sometimes'.
The DGV
This is a progressive downdraft carb, with one barrel opening after another. Never had the chance to use it, since I sold it first. Skywalker from SIC had the experience using it, while I only had the experience on purchasing it and making some money out of it. Here's some pics.
The DCNF36
Now, this was my first downdraft weber carb planted on my engine bay. Got it full set with manifold, custom adaptor and K&N airfilter. It's a double barrel carbs opening at the same time. Nice. Lovely sound. Good throttle response. FC is more or less the same with the OEM aisan carb.
Used it for about a month or two, then it's time for upgrades, to a better and nastier carbie. Yeah!!
DCOE40 (The King of It All!)
4 Barrel opening at the same time, well, what more could you ask! Have to throw a mild cam just to match the power produced from this mean devil at the tiny 4g13/5. engine. Getting the right tuning and setup is not easy, but not impossible. Once you got it right, it's an addicted habit to smack that acceleration pedal. Managed to get 0-100 at 9 secs.
After all of these, i've changed to a modified standard carbie. Ehem.
Conclusions: Carbs really do make wonders!
here's a video during dcoe days. just cruising on a normal road.night time.
Subscribe to:
Posts (Atom)